Game Maker Tutorial #1
Develop your first game in Game Maker!
LINKS AND DOWNLOADS
Game Maker Basic
by Mark Essen
This tutorial will walk through making a basic game from scratch in Game Maker. You can get Game Maker here for PC or here for Mac.
Getting Started
Here’s the game we’ll make: how about a bunch of balls are bouncing around a container until they break the walls and can escape. The player gets a point for every time he or she clicks a ball, but every time a ball is clicked it explodes and changes direction and goes faster. The game is over when all the balls escape.
When you start Game Maker, make sure you choose to load it in Advanced Mode.
Images
What sort of images will we need? Let’s keep it simple – how about a ball and a brick (to build the container).
Let’s make the ball. Go to Resources > Create Sprite. Sprites are images used to represent game objects. They can be animated, colorized, rotated, and scaled in game. If you already have an image you want to use you can click Load Sprite, but I’m going to make a new one.
Hit Edit Sprite, then File > New. 32 x 32 pixels is a good size for now, but make it whatever you want. Double-click the new frame called “Image 0,” which will bring up a paint program. The 32 x 32 pixel field will be very small, but you can zoom in using the magnifying glass in the corner. Using the tools, draw a big happy circle and give it a funny face. Here’s what I made:
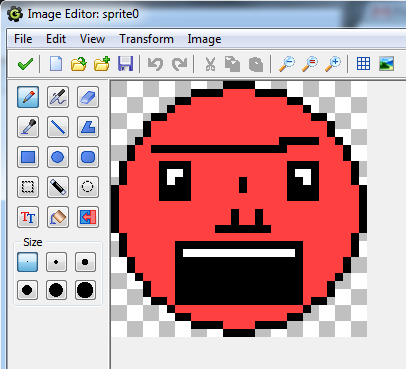
Hit the green check mark in the upper left to accept the changes made to this frame.
Now let’s animate it. Copy and paste the frame a few times and double-click on the duplicated frames and make slight alterations to each- maybe his mouth opens and closes? Check out the Animation drop down for some automated animations. Click the “Show Preview” checkbox on the left to see it in action. Experiment with it!
Click the green check when you are satisfied, name it “sprite0” (or whatever, but be consistent in your naming) and click Save Sprite.
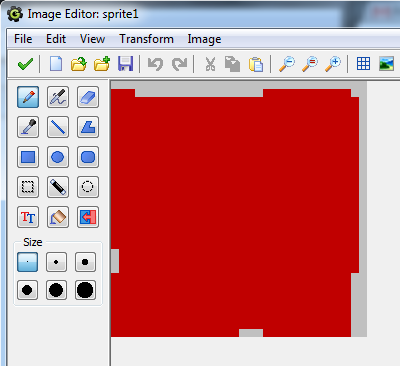
Okay, now bricks. Make a 32×32 sprite for a brick image that we can clone wherever we want walls. Mine looks like this, and I named it “sprite1.”
*If there is no “image 0,” just click the “Add Empty Image” button: ![]()
Now for audio. We need a click sound and an explode sound. To add sound effects, click Resources > Add Sound to bring up the Sound Properties window, and click Load Sound.
Game Maker has some premade sound effects, which you can browse and preview by clicking the green play button.
Or, I like using a program called sfxr to make sounds (you can directly download it here for PC or here for Mac). Generate some cool sounds and export them as WAVs. Then load them in Game Maker the same way you’d load up a premade sound.
Once you have a sound you like, rename it at the top of the window, and click “OK” at the bottom of the window to bring it into your project.We load music the same way as sound effects. Game Maker can play a lot of different formats like wav, midi, and mp3. Check out the Free Music Archive for some tunes.Programming
Okay, now the fun part. We need to combine our sounds and images together in a way that creates our game design of clicking balls to make them explode.
Let’s make three game objects: Brick, Ball and Logic (for keeping score and playing music).
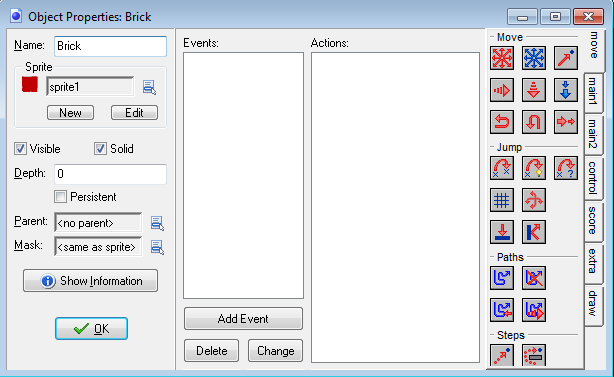
Go to Resources > Create Object. Name it Brick and pick your brick image from the sprite dropdown menu
Game Maker logic is event driven, so you have to tie actions to different events like collisions, timers, clicks, etc. All we want to do for our Brick is check the “Solid” checkbox on the left. This is for stationary objects involved in the Game Maker physics stuff.
Here’s how the Brick object properties should look:
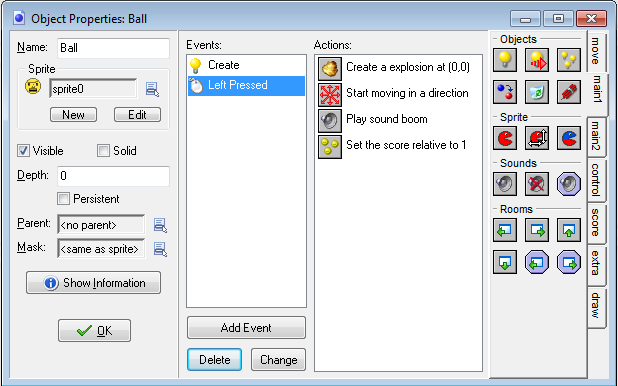
And let’s make a Ball almost in the same way – attach sprite0 or the image, AND leave “Solid” unchecked.
So now we want our Ball to start moving when the game begins. To do this, within the Object Properties window, click Add Event and choose a Create event. This is the event triggered when the ball is first created in the game.
Go over to the Move tab and drag the first icon, the one with the 8 way red arrows ![]()

Make sure to enter a speed as well, so the ball actually moves – I did 5. Then click OK.
Now let’s make it explode and change its trajectory when clicked. We want to know when the user clicks it so hit Add Event > Mouse > Left Pressed. This event is triggered when you press down on the left mouse button while the cursor overlaps this particular ball.
Explosion time. Go to the Draw tab on the right and drag over the Create Effect icon ![]()
We also want it to make an explosion sound effect. Sound actions are in the Main1 tab. Use the Play Sound icon ![]()
We want to give out points for clicks. Score actions are in the Score tab. Drag over the grey square bordered loose change icon ![]()
Now let’s change the direction of the ball and increase the speed. Use the same red arrow icon from the Create event with the same 8 directions selected. For the speed, enter speed + 1 (speed is a built in variable that tells the object how many pixels to move per frame).
Here’s how your Ball object should look so far (since none of these actions affect each other, they can be in any order):
Now we need the ball to bounce off of Bricks. Still in the Ball window, add a new event: Add Event > Collision > Brick object. Then add the Bounce action ![]() from the Move tab and make sure it’s set to bounce against solid objects since our Brick object is set to Solid. Now Game Maker knows to have the Ball bounce off the Bricks, but let’s also have the Ball destroy the Bricks. With the Collision-Brick event selected, drag the Destroy action
from the Move tab and make sure it’s set to bounce against solid objects since our Brick object is set to Solid. Now Game Maker knows to have the Ball bounce off the Bricks, but let’s also have the Ball destroy the Bricks. With the Collision-Brick event selected, drag the Destroy action ![]() and make sure it’s set to Other, meaning the ball will destroy the other object in this collision, in this case it’s the Brick. I added a different explosion and sound effect here just for fun.
and make sure it’s set to Other, meaning the ball will destroy the other object in this collision, in this case it’s the Brick. I added a different explosion and sound effect here just for fun.
Since the game is over when both balls escape, lets add an event for when our Ball leaves the room (AKA the level). Add Event > Other > Outside Room. Drag over the Destroy action we used before, but this time select “Self,” which will kill the Ball. Hit OK to finish editing the Ball object.
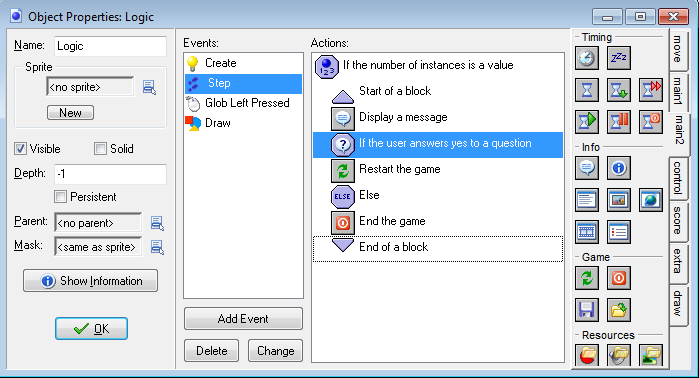
Let’s make our last object, the one to tell us when the player loses, to play the music, etc. I called mine “Logic.” This object doesn’t need a sprite.
First, to play music – Add Event > Create, then drag the Play Sound icon into the Actions window.
Choose the music you loaded into the project, and then make Loop true, so that the song will keep playing.
Let’s also have the score appear in the corner of the screen. To make sure the text will show up on top of other overlapping objects (like the Bricks), set Logic’s depth (found underneath the Solid checkbox) to -1, or anything less than the Ball/Brick depth. Since we want to draw something special instead of just displaying a single sprite, we need a new Draw event. Add Event > Draw, and then, from the Score tab, drag over the Score Draw action with the yellow square ![]()
I also want my click sound to play whenever the user presses down the mouse button, no matter where the cursor is. Add Event > Mouse > Global mouse > Global left pressed. Then from the Main1 tab, again drag the Play Sound action and attach the click sound you loaded into the project at the beginning.
Lastly we want to check for the conditions to end the game. Let’s use the Step event (Add Event > Step > Step), which is an event that is called every frame. From the Control tab, drag over the Test Instance Count icon ![]() and set the object to Ball and count equal to 0. This will runt he next action if the number of Balls in the level is equal to zero. We want to do more than one action for this case. To do this, we’ll use Start and End Blocks
and set the object to Ball and count equal to 0. This will runt he next action if the number of Balls in the level is equal to zero. We want to do more than one action for this case. To do this, we’ll use Start and End Blocks ![]()
![]() to bracket our actions.
to bracket our actions.
Add the following inside the blocks: From the Main2 tab, drag the Display Message icon ![]() and say something like “Game Over”, Check Question
and say something like “Game Over”, Check Question ![]() and say something like “Play again?”. If the user answers yes it will do the next action- Restart Game (from Main2), if they say no we need an Else (from Control) then a End Game (from Main2).
and say something like “Play again?”. If the user answers yes it will do the next action- Restart Game (from Main2), if they say no we need an Else (from Control) then a End Game (from Main2).
For these kinds of action, the order DOES matter. Here’s what mine looked like before I clicked OK:
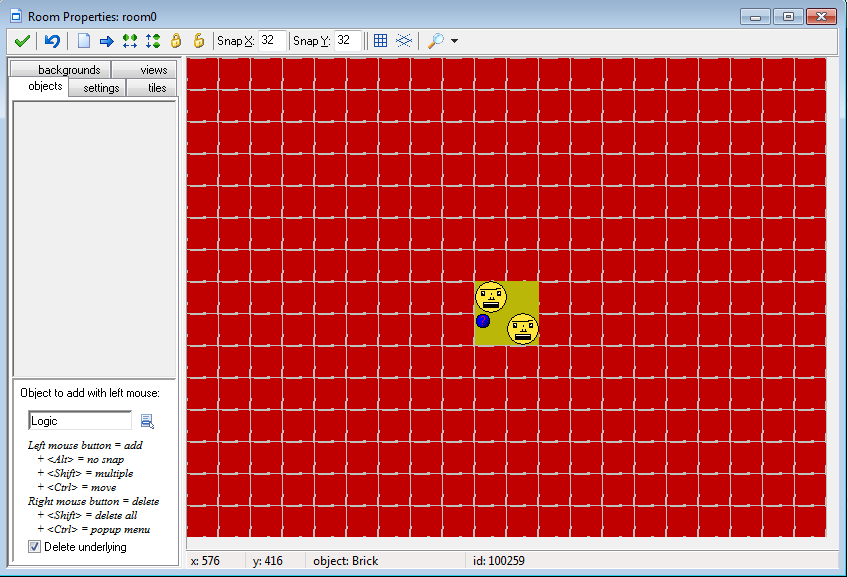
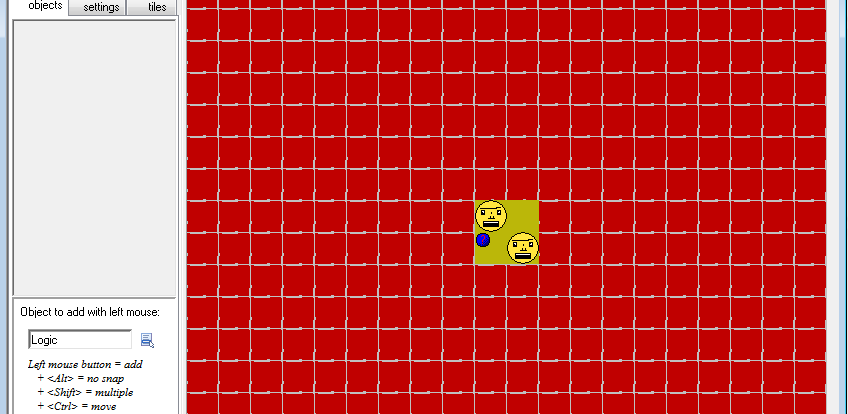
Finally, we need a level for this all to happen in. Resources > Create Room. With the Objects tab selected, click in the drop down under “object to add with left mouse,” and choose Brick. Follow the guide directly below that for how to fill your screen with bricks. Then add two Balls and your Logic object. It’ll look something like this: